Proper insulation is crucial for maintaining a comfortable and energy-efficient home. At Yorkshire Loft Ladders, we often encounter questions about the best ways to cut loft insulation rolls.
Whether you’re tackling a quick DIY project or simply want to understand the process better, this guide will provide you with valuable insights into cutting loft insulation rolls effectively and safely.
Understanding the Importance of Precise Cutting
Before we delve into the cutting techniques, it’s essential to understand why precise cutting matters. Loft insulation works by trapping air within its fibres, creating a barrier against heat transfer. When insulation is cut improperly or doesn’t fit snugly between joists, it can lead to gaps that compromise its effectiveness. These gaps can result in heat loss, increased energy bills, and potential issues with condensation.
Preparing for the Task
Safety should always be your top priority when handling insulation materials. While we at Yorkshire Loft Ladders handle the installation process for our customers, we believe it’s important for homeowners to understand the safety precautions involved.
Firstly, ensure you’re working in a well-ventilated area. If you’re in the loft, open any windows or vents to allow fresh air circulation. Next, don your personal protective equipment (PPE). This should include:
1. A dust mask or respirator to prevent inhalation of fibres
2. Safety goggles to protect your eyes
3. Gloves to shield your hands from irritation
4. Long-sleeved clothing and trousers to minimise skin exposure
With safety sorted, gather your tools. You’ll need:
1. A sharp utility knife or insulation saw
2. A tape measure
3. A straight edge or spirit level
4. A marker pen
5. A solid board to use as a cutting surface
Measuring and Marking
Accurate measurements are the foundation of well-fitted insulation. Start by measuring the space between your loft joists where the insulation will be installed. It’s worth noting that joist spacing can vary, so don’t assume all spaces are uniform.
Once you have your measurements, transfer them to your insulation roll. Unroll a portion of the insulation onto your cutting board, and use your tape measure and marker to indicate where you’ll need to cut. It’s generally advisable to add an extra 1-2 cm to your measurements to ensure a snug fit.
Cutting Techniques for Different Insulation Types
The cutting method you’ll use depends on the type of insulation you’re working with. Let’s explore the techniques for the most common types:
Fibreglass Insulation
Fibreglass is a popular choice for loft insulation due to its effectiveness and affordability. To cut fibreglass insulation:
1. Lay the insulation on your cutting board with the paper backing (if present) facing down.
2. Place your straight edge along the cutting line.
3. Using your utility knife, score along the line, pressing firmly but not so hard that you cut through to the board beneath.
4. Once scored, you should be able to separate the insulation along the cut line. If needed, use your knife to complete the cut.
Mineral Wool Insulation
Mineral wool, also known as rock wool, requires a slightly different approach:
1. Position the insulation on your cutting surface.
2. Use a serrated knife or bread knife for cutting.
3. Compress the insulation slightly with your straight edge.
4. Using a sawing motion, cut through the insulation along your marked line.
Sheep’s Wool Insulation
For those opting for natural insulation like sheep’s wool:
1. Place the insulation on your cutting board.
2. Use a sharp pair of scissors or shears to cut along your marked line.
3. Take care to maintain an even cut to ensure consistent insulation performance.
Tips for Precise Cutting
Regardless of the insulation type, there are some universal tips that can help you achieve more precise cuts:
1. Always cut on a solid, flat surface to ensure clean lines.
2. Keep your cutting tools sharp. Dull blades can lead to jagged edges and uneven cuts.
3. When in doubt, cut slightly larger than needed. It’s easier to trim excess than to deal with gaps.
4. For pre-perforated rolls, try to utilise the existing perforations where possible to minimise cutting.
Handling Special Cutting Situations
Lofts often present unique challenges when it comes to insulation fitting. You may need to cut around obstacles like pipes, electrical boxes, or irregular spaces. In these cases:
1. Create a template using cardboard or paper to get the exact shape needed.
2. Transfer this template to your insulation and cut carefully.
3. For small gaps around pipes or wires, cut a slit in a piece of insulation and slide it around the obstacle.
Post-Cutting Handling and Installation
After cutting your insulation, handle it carefully to maintain its loft (thickness). Avoid compressing the insulation, as this reduces its effectiveness. When installing, ensure each piece fits snugly between joists without being squeezed or compressed.
Cleaning Up and Disposal
Once you’ve finished cutting and installing your insulation, it’s important to clean up thoroughly. Vacuum any loose fibres and dispose of offcuts responsibly. Many local recycling centres accept insulation materials, so check with your local council for proper disposal methods.
How Thick Should Loft Insulation Be?
Before you start cutting your loft insulation rolls, it’s important to know how thick your insulation actually needs to be. In the UK, the recommended depth for loft insulation is 270mm. This level has been set to help homes meet modern energy efficiency standards and reduce heat loss through the roof — one of the main areas where warmth escapes.
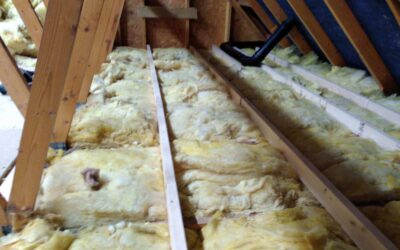
If you’re starting from scratch, aim to lay insulation in two layers: the first layer goes between the joists (usually around 100mm thick), and the second layer is laid across the top at a right angle to bring the total depth up to around 270mm.
Already have some insulation in place? If it’s less than 270mm, you can simply top it up with a new layer. There’s no need to remove what’s already there unless it’s damaged or damp.
Keeping your insulation at the correct thickness is just as important as cutting it to size neatly. Cutting it too thin to make boarding easier or to save time could reduce its effectiveness. So while trimming rolls to fit is part of the job, always make sure you maintain that full depth for the best results in comfort and energy savings.
Our Final Say!
Cutting loft insulation rolls correctly is a crucial step in ensuring your home is well-insulated and energy-efficient. While this guide provides a comprehensive overview of the process, it’s important to remember that professional installation often yields the best results.
At Yorkshire Loft Ladders, we specialise in loft ladder installation, loft boarding, and loft insulation services. Our experienced team ensures that your loft is properly insulated, maximising energy efficiency and comfort in your home. If you’re considering a loft insulation project, why not get in touch with on freephone 0800 612 8359 for a no-obligation free home survey? Our loft experts can assess your needs and provide tailored advice to ensure your loft is insulated to the highest standards.
Remember, a well-insulated loft not only keeps your home warmer in winter and cooler in summer but can also lead to significant savings on your energy bills. Whether you’re tackling the job yourself or seeking professional help, proper loft insulation is an investment in your home’s comfort and efficiency.
Loft Ladders Hampsthwaite – Loft Ladders Calcutt – Loft Ladders Farnham